Hi again!
In this post, we want to talk about the AndEngine forum. As all of you who looked into it must have noticed, it is unfortunately completely unuseable. Spam bots are everywhere, every thread is getting flooded away within minutes. The problem is, that almost all mods are gone and the very few remaining can not fight against all of this by themselves - plus they do not have the proper rights to create new mods who could help clean the mess.
But because there are still a lot of people interested in AndEngine - people who want to have a platform to talk about it - we thought we would give it a try and recreate the forum on another host. By now, there are quite some people in there and the community is growing every day.
So if you also are interested in AndEngine, come and join the new forum.
www.andengine-community.com
Donnerstag, 25. Dezember 2014
Freitag, 19. Dezember 2014
A little something about our project: Nightmare Defender
In this post we want to tell you something about our project, it is called "Nightmare Defender". Nightmare Defender is an Android game that will be available in Google Play pretty soon.
It is basically one of this defender games, where you have to defend your castle against a horde of monsters. So there you are, equipped with bow and arrow to do your best to protect your lovely castle against creatures of the dark. Besides there are a couple of magical spells you can learn and cast that help you in your endless battle. Same old until now.
But this will not be enough in the long run, the shadow creatures are getting strogner really fast and end bosses make your life even harder. You need the help of guards!
Guards are creatures whose only purpose in life is to save your ass. Train them, evolve their abilities and you might stand a chance. Your guards will change their appearance and abilities as they get stronger.
A ton of other abilities will help you along the way.
Here is a quick screenshot:
Dienstag, 16. Dezember 2014
GameDev Tutorial: Creating sounds with cheap equipment!
Hi!
We indie game devolpers often need sounds. There are already quite some good public domain and Attribution license resources out there, but often you just do not find what you look for. In this case your only choice (if you have no money to spend) is making this stuff yourself.
I am often forced to do so. Having only very crappy equipment and not really the money to buy fancy stuff, I needed to find a way to create sounds in acceptable quality with this very crappy stuff.
This is what I have:

It is a very cheap webcame I "borrowed" (stole XD) from my wife. I use this as my microphone. This can only produce very crappy sound quality with a lot of noise is probably what you are thinking right now. And yes, you are right :D. That's indeed what it does. There is a lot of noise in the sound file that this little thing is able to generate.
But there is this awesome tool you probably already know of - Audacity!
It is open-source and thus completly free. But it is doing an amazing job on noise removal!
I want to show you how to exploit that!
So when you record something with Audacity, and you have a very bad "microphone", your file might look something like this:
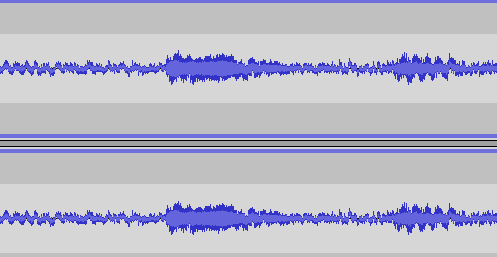
As you can see there is a lot of noise in there. And here is the trick: Before you record your actual sound, let your "microphone" record the "silence" of your room. Something like two or three seconds of silence. After that, record the actual sound.
When you are ready, go and select the silence part of the recording:

After that, go to the menu point "Effect" and select the "Noise Removal" Option:

In the upcoming window, click on the "Get Noise Profile" button:

The window will simply disappear. But Audacity did what it had to do!
Now go ahead and select your whole recording (ctrl+A). After that, go again to Effect--> Noise Removal - but this time, click on the Ok button.
And baaam, the noise is gone!

Audacity does a pretty good job on this. I was able to produce some pretty decent stuff. It may not be the high quality huge game studios can produce, but they also spend a buttload of money on that. And compared to that - one can produce amazing stuff using this very simple technique.
Thanks for reading!
We indie game devolpers often need sounds. There are already quite some good public domain and Attribution license resources out there, but often you just do not find what you look for. In this case your only choice (if you have no money to spend) is making this stuff yourself.
I am often forced to do so. Having only very crappy equipment and not really the money to buy fancy stuff, I needed to find a way to create sounds in acceptable quality with this very crappy stuff.
This is what I have:
It is a very cheap webcame I "borrowed" (stole XD) from my wife. I use this as my microphone. This can only produce very crappy sound quality with a lot of noise is probably what you are thinking right now. And yes, you are right :D. That's indeed what it does. There is a lot of noise in the sound file that this little thing is able to generate.
But there is this awesome tool you probably already know of - Audacity!
It is open-source and thus completly free. But it is doing an amazing job on noise removal!
I want to show you how to exploit that!
So when you record something with Audacity, and you have a very bad "microphone", your file might look something like this:
As you can see there is a lot of noise in there. And here is the trick: Before you record your actual sound, let your "microphone" record the "silence" of your room. Something like two or three seconds of silence. After that, record the actual sound.
When you are ready, go and select the silence part of the recording:
After that, go to the menu point "Effect" and select the "Noise Removal" Option:
In the upcoming window, click on the "Get Noise Profile" button:
The window will simply disappear. But Audacity did what it had to do!
Now go ahead and select your whole recording (ctrl+A). After that, go again to Effect--> Noise Removal - but this time, click on the Ok button.
And baaam, the noise is gone!
Audacity does a pretty good job on this. I was able to produce some pretty decent stuff. It may not be the high quality huge game studios can produce, but they also spend a buttload of money on that. And compared to that - one can produce amazing stuff using this very simple technique.
Thanks for reading!
Dienstag, 9. Dezember 2014
AndEngine Tutorial: Displaying some graphics - the right way
Hi.
We had a lot of stuff to do in the last couple of days, but now I thought it was time again to post something.
Based on some trouble I notice a lot of new AndEngine users have, I wanted to write a little something about working with sprites. So let's cover the basics at first real quick.
Notice that we use AndEngine GLES2 (not AC), so the code snippets probably won't work 1-1 if you use AnchorCenter. But the basic stuff still applies. Do not skip the UpdateThread part of this tutorial, as this is something almost every beginner is doing wrong, getting really ugly errors.
There are a few sprite types you can use in AndEngine:

A TiledSprite is a Sprite that is divided/"cut" into tiles. The image you use for that is getting "cut" into rectangles. So if you specify a 3x2 TiledSprite, the image you use for that will be cut into 6 equally big tiles and a TiledSprite will display only one of this tiles at the same time. Of course you can tell the TiledSprite which tile you want to display.

The AnimatedSprite is a TiledSprite with the advantage, that you can animate it by telling which of the tiles it should display in which order and for how long. So you can create something that is often called a sprite sheet, with different states of some graphic that you want to animate on the same image file. For example the different positions of a stick figure that is doing some movements.

At first you have to create the TextureAtlas:
The variables width and height should be at least the size of your image file you want to load.
And using this TextureAtlas and the BitmapTextureAtlasTextureRegionFactory class, we can easily create our TextureRegion.
Notice the first line, where we set the AssetBasePath to "/gfx". This means that the "myImage.png" file will be looked for in your assets/gfx/ directory. You do not need to specify this every time you create a new TextureAtlas/Region and Sprite, the Factory will remember the last thing you configured. But it is safe to call it if you have more than one directory you load images from and constantly switch the AssetBasePath, otherwise it can lead to nasty bugs where AndEngine can not find a certain file all of a sudden, simply because you changed the path in your last call to something else.
In order for your TextureAtlas to be loaded into memory, you need to call "load()" on it. Like that:
Now we have everything we need to create a Sprite. This is done like that:
pX and pY will be the position of the Sprite, but of course you can change this later by calling "mySprite.setPosition(x,y);".
The whole thing in one snippet would be the following:
Also please notice: You can create as many Sprites(of the same kind) out of one TextureAtlas+Region as you like and you need to "load()" every TextureAtlas only once, so you do not have to create and load new ones for every new Sprite that uses the same texture (image). You just need to create this stuff for every new image you want to load into memory.
The last two arguments of the "createTiledFromAsset(...)" method are the columns and the rows.
So you will get three columns and two rows, resulting in 6 different tiles.
Your TiledSprite will display the tile with index 0 per default. You can change the current displayed tile by calling "setCurrentTileIndex(index)" on your TiledSprite. The following image demonstrates how the above code would divide the image file and what the indices of the tiles would be:

The magic happens, when you call the "animate(...)" method on your AnimatedSprite. My favorite one is the following, which gives you quite good control over what happens:
The second parameter is an int array. This one specifies the indices of your tiles in the order you want them to be displayed.
The last parameter is a boolean which specifies if you want to loop the animation. This means that after it displayed tile 0, 1 and 2 it would start from the beginning displaying 0 etc. again.
The second approach should be favored if you want to have something like layers, but this can be explained in another post.
The simple approach that is often seen in tutorials is to simply do this:
While this is true, the very important part about the whole thing is missing! You ALWAYS have to attach your stuff (like Shapes or Sprites) you want to be drawn on the UpdateThread! Otherwise this will lead to something like "
Something that is really ugly to debug because the Exception trace usually does not give you any hint which portion of YOUR code produced the Exception.
To avoid this and have a clean code base, attach AND detach the stuff you want to be drawn always on the UpdateThread like this:
You could use my class like this to safely attach or detach your stuff:
The parameters in this call are your activity, your parent (on which your Sprite should be attached) and your Sprite itself of course.
The class looks like this:
We had a lot of stuff to do in the last couple of days, but now I thought it was time again to post something.
Based on some trouble I notice a lot of new AndEngine users have, I wanted to write a little something about working with sprites. So let's cover the basics at first real quick.
Notice that we use AndEngine GLES2 (not AC), so the code snippets probably won't work 1-1 if you use AnchorCenter. But the basic stuff still applies. Do not skip the UpdateThread part of this tutorial, as this is something almost every beginner is doing wrong, getting really ugly errors.
Basics
When you write a game one of the most important things is to display some graphics, these are usually called sprites in the 2D game development scene. And this is what they are called in AndEngine as well.There are a few sprite types you can use in AndEngine:
- Sprite
- TiledSprite
- AnimatedSprite
A TiledSprite is a Sprite that is divided/"cut" into tiles. The image you use for that is getting "cut" into rectangles. So if you specify a 3x2 TiledSprite, the image you use for that will be cut into 6 equally big tiles and a TiledSprite will display only one of this tiles at the same time. Of course you can tell the TiledSprite which tile you want to display.
The AnimatedSprite is a TiledSprite with the advantage, that you can animate it by telling which of the tiles it should display in which order and for how long. So you can create something that is often called a sprite sheet, with different states of some graphic that you want to animate on the same image file. For example the different positions of a stick figure that is doing some movements.
TextureAtlas & TextureRegion
Before you can create your Sprite, you need to create a TextureAtlas and a TextureRegion. There are already plenty of good tutorials that explain what exactly these things are, so I am not going to repeat this stuff. The most improtant fact that you need to know at first is, that you need to create them before you can create your sprite.Creating a Sprite
So lets see how we can create a Sprite with AndEngine GLES2 (not AC! But it should be pretty similar.).At first you have to create the TextureAtlas:
myTextureAtlas = new BitmapTextureAtlas(activity.getTextureManager(), width, height, TextureOptions.BILINEAR_PREMULTIPLYALPHA);
The variables width and height should be at least the size of your image file you want to load.
And using this TextureAtlas and the BitmapTextureAtlasTextureRegionFactory class, we can easily create our TextureRegion.
 BitmapTextureAtlasTextureRegionFactory.setAssetBasePath("gfx/");
 myTextureRegion = BitmapTextureAtlasTextureRegionFactory.createFromAsset(myTextureAtlas, activity, "myImage.png",0, 0);
Notice the first line, where we set the AssetBasePath to "/gfx". This means that the "myImage.png" file will be looked for in your assets/gfx/ directory. You do not need to specify this every time you create a new TextureAtlas/Region and Sprite, the Factory will remember the last thing you configured. But it is safe to call it if you have more than one directory you load images from and constantly switch the AssetBasePath, otherwise it can lead to nasty bugs where AndEngine can not find a certain file all of a sudden, simply because you changed the path in your last call to something else.
In order for your TextureAtlas to be loaded into memory, you need to call "load()" on it. Like that:
myTextureAtlas.load();
Now we have everything we need to create a Sprite. This is done like that:
Sprite mySprite = new Sprite(pX, pY, myTextureRegion,activity.getVertexBufferObjectManager());
pX and pY will be the position of the Sprite, but of course you can change this later by calling "mySprite.setPosition(x,y);".
The whole thing in one snippet would be the following:
 myTextureAtlas = new BitmapTextureAtlas(activity.getTextureManager(), width, height, TextureOptions.BILINEAR_PREMULTIPLYALPHA);
 BitmapTextureAtlasTextureRegionFactory.setAssetBasePath("gfx/");
 myTextureRegion =BitmapTextureAtlasTextureRegionFactory.createFromAsset(myTextureAtlas, activity, "myImage.png",0, 0);
 myTextureAtlas.load();
 Sprite mySprite = new Sprite(pX, pY,myTextureRegion,activity.getVertexBufferObjectManager());
Also please notice: You can create as many Sprites(of the same kind) out of one TextureAtlas+Region as you like and you need to "load()" every TextureAtlas only once, so you do not have to create and load new ones for every new Sprite that uses the same texture (image). You just need to create this stuff for every new image you want to load into memory.
Creating a TiledSprite
The same mechanics are used to create the other Sprite types as well, the only difference is that you need to call "createTiledFromAsset(...)" on the BitmapTextureAtlasTextureRegionFactory. The whole code in one thing: myTextureAtlas = new BitmapTextureAtlas(activity.getTextureManager(), width, height, TextureOptions.BILINEAR_PREMULTIPLYALPHA);
BitmapTextureAtlasTextureRegionFactory.setAssetBasePath("gfx/");
myTiledTextureRegion = BitmapTextureAtlasTextureRegionFactory.createTiledFromAsset(myTextureAtlas, activity,"mySpriteSheet.png", 0, 0, 3, 2);
myTextureAtlas.load();
TiledSprite sprite = new TiledSprite(y, x, myTiledTextureRegion,activity.getVertexBufferObjectManager());
The last two arguments of the "createTiledFromAsset(...)" method are the columns and the rows.
So you will get three columns and two rows, resulting in 6 different tiles.
Your TiledSprite will display the tile with index 0 per default. You can change the current displayed tile by calling "setCurrentTileIndex(index)" on your TiledSprite. The following image demonstrates how the above code would divide the image file and what the indices of the tiles would be:
Creating an AnimatedSprite
And again, creating the AnimatedSprite is pretty much the same, you create your TiledTextureRegion but instead of creating a TiledSprite out of it, you create your AnimatedSprite. Like this: myTextureAtlas = new BitmapTextureAtlas(activity.getTextureManager(), width, height, TextureOptions.BILINEAR_PREMULTIPLYALPHA);
BitmapTextureAtlasTextureRegionFactory.setAssetBasePath("gfx/");
myTiledTextureRegion = BitmapTextureAtlasTextureRegionFactory.createTiledFromAsset(myTextureAtlas, activity,"mySpriteSheet.png", 0, 0, 3, 2);
myTextureAtlas.load();
AnimatedSprite sprite = new AnimatedSprite (y, x, myTiledTextureRegion,activity.getVertexBufferObjectManager());
The magic happens, when you call the "animate(...)" method on your AnimatedSprite. My favorite one is the following, which gives you quite good control over what happens:
 boolean loop = true;
 sprite.animate(new long[] { 140, 140,140 }, new int[] {0,1,2}, loop);
The second parameter is an int array. This one specifies the indices of your tiles in the order you want them to be displayed.
The last parameter is a boolean which specifies if you want to loop the animation. This means that after it displayed tile 0, 1 and 2 it would start from the beginning displaying 0 etc. again.
Actually displaying the Sprite: UpdateThread
Creating your Sprite instance will of course not lead to the instant displaying of it on your screen. Before your sprite can be drawn/displayed, it has to be attached to the current Scene instance or to some Entity that itself (or one of its ancestors/parents) is attached to the Scene (or the HUD).The second approach should be favored if you want to have something like layers, but this can be explained in another post.
The simple approach that is often seen in tutorials is to simply do this:
mScene.attachChild(sprite);
While this is true, the very important part about the whole thing is missing! You ALWAYS have to attach your stuff (like Shapes or Sprites) you want to be drawn on the UpdateThread! Otherwise this will lead to something like "
FATAL EXCEPTION: UpdateThread
java.lang.IndexOutOfBoundsException: Invalid index 11, size is 0..."
Something that is really ugly to debug because the Exception trace usually does not give you any hint which portion of YOUR code produced the Exception.
To avoid this and have a clean code base, attach AND detach the stuff you want to be drawn always on the UpdateThread like this:
 activity.runOnUpdateThread(new Runnable() {
                                    @Override
                                    public void run() {
                                         mScene.attachChild(mySprite);  //or mySprite.detachSelf()
                                    }
                               });
Easier way attaching/detaching
As you can see attaching your Sprites (Entites) the right way leads to a very bloated code plus it leads to heavy code duplication. To avoid blowing up your code unnecessarily, you should create yourself a Util class that hides away all the unnecessary stuff. I share my own version with you :). But notice again, this will not work with AndEngine GLES2 Anchor Center, as you need to call the "runOnUpdateThread" method on Engine instead of Activity. I am not sure if there are other differences one would need to adapt. But I am sure you will be able to change this little differences if you need to. :DYou could use my class like this to safely attach or detach your stuff:
SafeAttachDetach.attach(activity, mScene, mySprite);
The parameters in this call are your activity, your parent (on which your Sprite should be attached) and your Sprite itself of course.
The class looks like this:
 import java.util.ArrayList;
 import java.util.List;
 import org.andengine.entity.IEntity;
 import org.andengine.ui.activity.BaseGameActivity;
 public class SafeAttachDetach{
      public static void attach(BaseGameActivity activity, final IEntity parent, final IEntity child)
      {
           activity.runOnUpdateThread(new Runnable()
           {
                public void run()
                {
                     if(child != null && parent != null && child.hasParent() == false)
                     parent.attachChild(child);
                }
           });
      }
      public static void detach(BaseGameActivity activity, final IEntity entityToDetach)
      {
           activity.runOnUpdateThread(new Runnable()
           {
                public void run()
                {
                     if(entityToDetach != null )
                     entityToDetach.detachSelf();
                }
           });
      }
      public static void massAttach(BaseGameActivity activity, final IEntity parent, final List<IEntity> children)
      {
           activity.runOnUpdateThread(new Runnable()
           {
                public void run()
                {
                     ArrayList<IEntity> copyOfList = new ArrayList<IEntity>(children);
                     for(IEntity entity : copyOfList)
                     {
                          if(entity != null && parent != null && entity.hasParent() == false)
                          parent.attachChild(entity);
                     }
                }
           });
      }
      public static void massDetach(BaseGameActivity activity,  final List<IEntity> children)
      {
           activity.runOnUpdateThread(new Runnable()
           {
                public void run()
                {
                     ArrayList<IEntity> copyOfList = new ArrayList<IEntity>(children);
                     for(IEntity entity : copyOfList)
                     {
                          if(entity != null)
                          entity.detachSelf();
                     }
                }
           });
      }
 }
Abonnieren
Posts (Atom)